How to Create QR Code Signage
I. Function Introduction
QR code signage is a key tool for on-site risk point management, supporting:
- Quick Identification: Mobile scanning instantly retrieves risk information
- Dynamic Updates: Background modifications sync in real-time to field
- Data Collection: Scanning automatically records inspection trails
- Anti-counterfeiting Traceability: Unique codes ensure data authenticity
Applicable Scenarios:
- Equipment inspection
- Hazard identification
- Safety training
- Emergency response
II. Operation Guide
1. Access QR Code Function
- Administrator logs in to Management Backend
- Navigation menu select: 【Risk Identification】→【Risk Points】
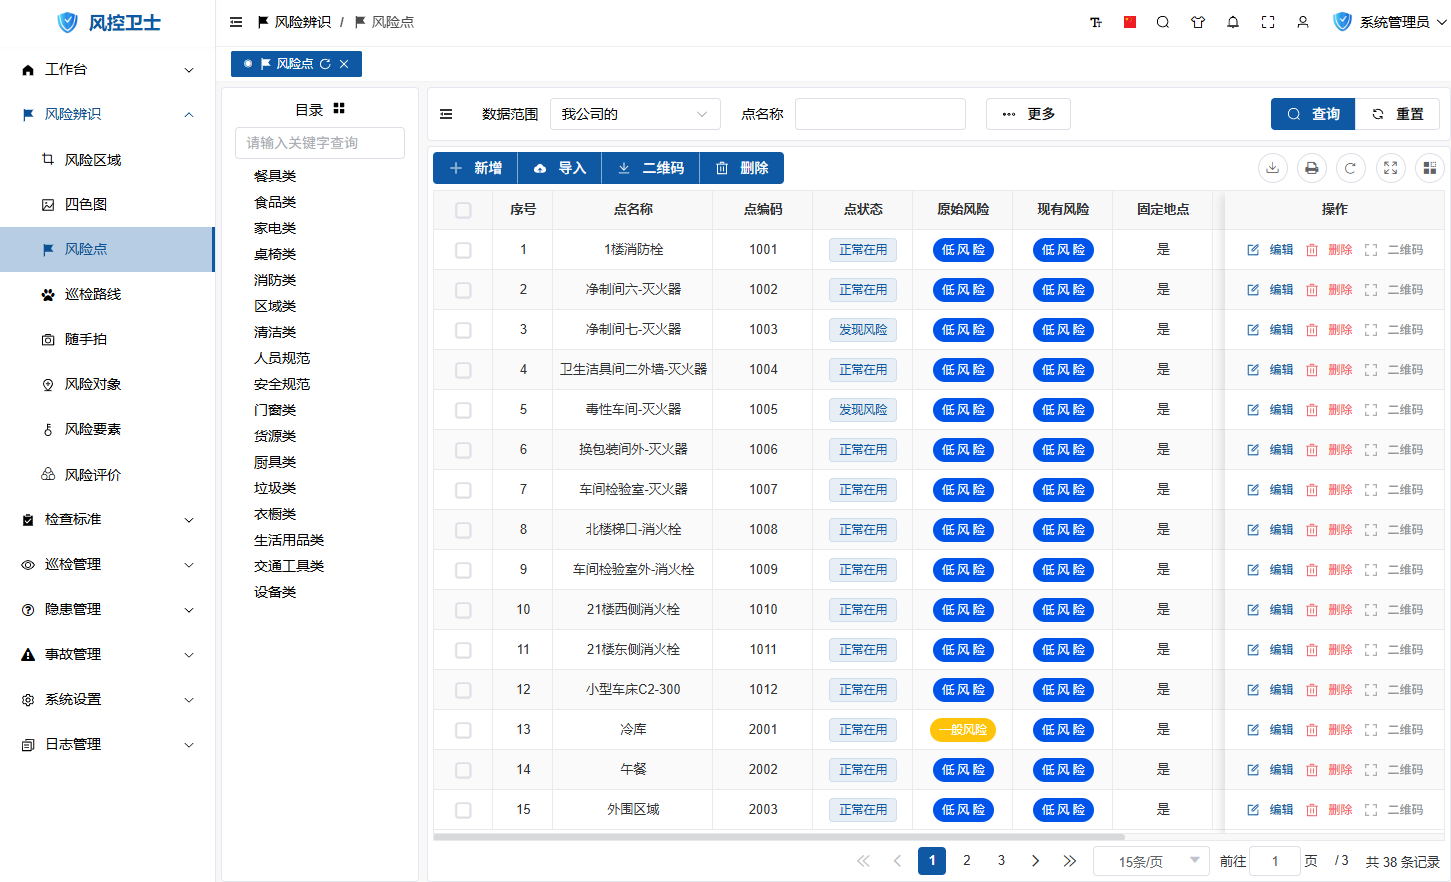
2. Generate Single QR Code
Operation Steps:
- Locate target risk point
- Click "QR Code" button in operation column

- Select operation:
- Direct Print: A4 paper/label paper
- Export PDF: Vector format
3. Batch Export QR Codes
Operation Steps:
- Check required risk points
- Click "QR Code" button on toolbar
- Export format: Merged PDF file
4. Signage Production Standards
| Element | Requirement | Recommendation |
|---|---|---|
| Size | Minimum 4×4cm | Adjust based on installation location |
| Material | Waterproof/sunproof | PVC recommended for outdoors |
| QR Code | Minimum 1×1cm | ≥30% area coverage |
| Risk Information | Include: - Point name - Risk level - Responsible person | Font size ≥5 |
| Installation Location | Visible and scannable | Approx. 1.5m above ground |
III. Template Customization
1. Access Template Editing
- Navigation menu select: 【System Settings】→【Print】
- Find "SysQRCode" template
- Click
 edit button in operation column
2. Visual Editing
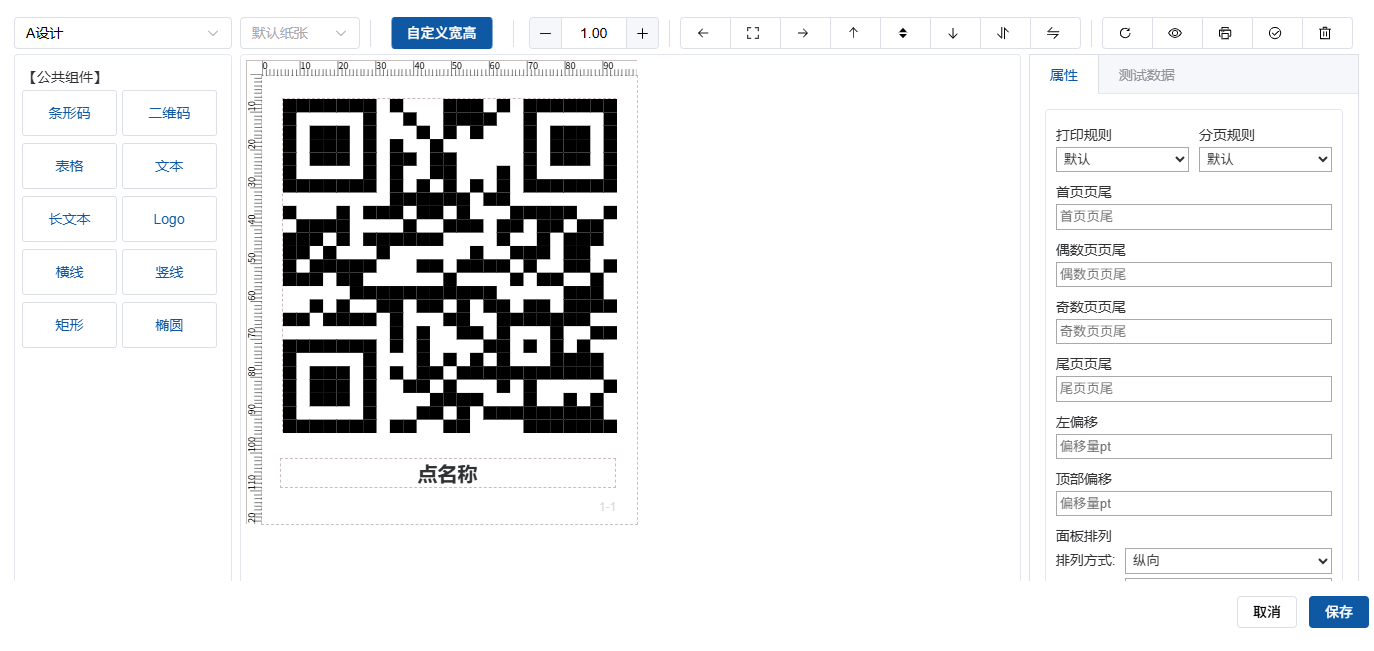
Customizable Elements:
- Layout Adjustment:
- Drag to reposition QR code
- Set margins/spacing
- Information Display:
- Add/hide fields (code/name/level)
- Set font/color
- Brand Identification:
- Add company logo
- Set background watermark
3. Template Saving and Application
- After completing edits
- Click "Save" button at bottom right
IV. Production Process
1. Design Phase
- Determine signage size
- Design layout:
- Company logo area
- Risk information area
- QR code main area
- Warning symbol area
2. Manufacturing
- Material Selection:
- Indoor: PET/Acrylic
- Outdoor: PVC/Stainless steel
- Printing Process:
- UV coating for scratch resistance
- UV-resistant ink
- Installation Methods:
- Adhesive
- Hanging
- Embedded
3. On-site Installation
- Location Selection:
- Visible equipment position
- Near safety passages
- Around operation consoles
- Installation Requirements:
- No obstructions
- Good lighting
- Height 1.2-1.8m
- Acceptance Criteria:
- Mobile scanning success rate ≥99%
- Information recognition time ≤2 seconds
V. Precautions
1. QR Code Generation Standards
- Error Correction Level: Recommended ≥30% (Level L)
- Size: Minimum 32×32 pixels
- Contrast: Dark background with light code/Light background with dark code
- Quiet Zone: ≥4 module widths around
2. Signage Maintenance
- Regular Inspection:
- Monthly integrity check
- Clean surface stains
- Update Mechanism:
- Update within 72 hours of risk point changes
- Batch reprint after template modifications
- Damage Handling:
- Replace immediately upon discovery
- Recycle and destroy old signs
3. Safety Requirements
- Prohibit covering/altering
- Tamper-proof design (optional)
- Regular replacement (recommended every 2 years)
VI. Best Practices
1. Efficient Production Solutions
- Batch Generation:
- Generate by area groups
- Use sequential numbering
- Template Optimization:
- Add positioning marks
- Pre-set cutting lines
- Outsourced Production:
- Provide design specifications
- Require sample confirmation
2. Innovative Applications
- NFC Integration:
- Dual-mode QR code + NFC identification
- Enhance anti-cheating capability
- AR Enhancement:
- Scan to view 3D models
- Display real-time data
- Smart Alerts:
- Automatic risk notifications upon scanning
- Expiration proximity alerts
3. Cost Control
- Bulk purchasing to reduce unit price
- Standardized sizes to minimize tooling
- Electronic signage alternatives